
Stock DeLoreans feature two 4" x 10" Craig speakers on the side walls behind the seats, below the point where the seatbelt is attached to the trim. They can easily be identified by the holes in the trim panel. It is not uncommon for the original speakers to no longer be functional. While not as easy to replace as the front speakers, the process is not exceedingly difficult, and will result in an immediate improvement in sound quality.
Choosing New Speakers[]

A new 4"x10" Eclipse speaker (left) may be used to upgrade an original Craig speaker (right).
Any 4" x 10" speaker can be used to replace the original Craig speakers. A pair of new speakers can be found for $40 to $120 USD from many audio sound system either locally or online. Although smaller speakers can be used, larger speakers or circular speakers may not fit due to space constraints and the shape of the cavity. The speakers are held in with a large hose clamp that attaches around the magnet, making the location mounting holes less of an issue.
Replacing[]
The rear speakers are mounted behind the trim panels on either side of the parcel shelf, just below the upper bolt that secures the seat belts. The trim is held in place by two screws, two fir trees, and the upper seat belt bolt itself. The outer edge of the trim, however, is glued in place, and this must be pried up before the panel can be removed.
These instructions assume you are installing a suitable 4"x10" speaker, similar to the Eclipse SE-8405. Note that there may be differences between vehicles, and these instructions may not directly match your vehicle. Be sure to check the alternate instructions below for other options.
Tools[]
- Flathead jewelers screwdriver or small putty knife, to pry up the glued-down edge of the trim.
- Philips screwdriver, to remove the screws.
- Flathead screwdriver, to loosen and tighten the hose clamp holding the speaker.
- Small pliers, to pull up the trim previously pried up with the screwdriver.
- Socket wrench with a 17 mm socket, to remove the seat belt bolt.
Steps[]

Prying up the glued-down trim edge with a flathead jewelers screwdriver.

Using pliers to pull up the the edge of the trim (left), and after the glued-down section has been released (right).

One philips screw is below the arm rest (left), and another is just in front of it (right).

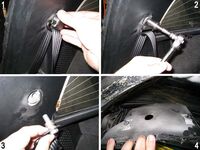
After the cover is pulled off (1), the seat belt bolt can be removed with socket wrench and a 17mm socket (2). Be sure not to lose the spacer and washer (3). The trim panel is held on fast with two fir trees, one above and one below the seat belt bolt (4).
- Remove the weather stripping from around the trim panel, from the floor up to the center of the ceiling. The weather stripping is simply pressed on, and can be easily pulled off with no tools. This will reveal the glued-down portion of the trim.
- Using a small flathead jewelers screwdriver, carefully pry up the glue behind the weather stripping. The trim's edge is cut into flaps a few inches long, and the blade of the screwdriver can used be slide underneath to separate the glue from the body. Once a corner is free, you can use the Small pliers to pull up the rest of the flap. Repeat this process around the entire edge of the panel until it is free.
- If the glue is particularly strong, you may be able to loosen it with a hair dryer. Be aware that this may warp the vinyl, so be sure to apply this carefully.
- If the glue simply refuses to come loose, you can resort to cutting the trim panel as close to the edge as possible. This should be done only as a last resort; you can't go back and uncut a mistake. Depending on the vehicle, it may prove necessary to cut the very edge of the trim in order to get the screwdriver or putty knife under it.
- Pull the seat all the way forward to improve access to the trim piece and speaker.
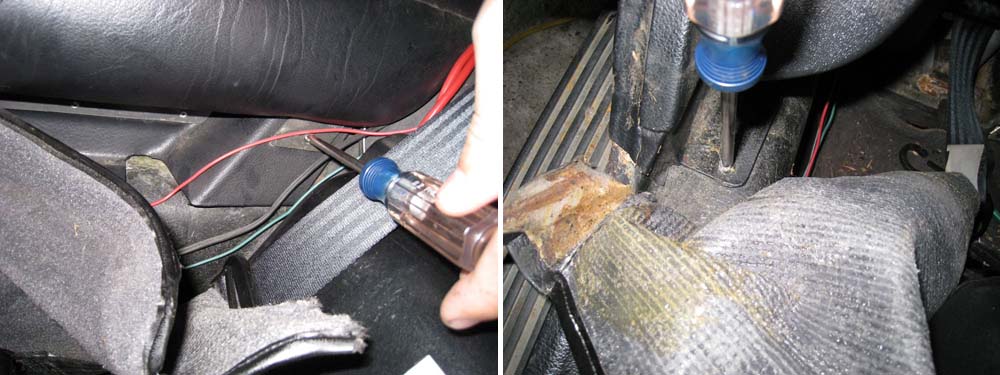
- Pull back edge of the floor carpet near the lower seat belt away from the door, exposing the two screws at on the edge of the door trim near the arm rest. You may find it easier to get to the forward screw after removing the lower seat belt bolt with a 17 mm socket wrench, but this isn't absolutely necessary.
- Remove the screw located below under the arm rest with a philips screwdriver.
- Remove the screw on the door sill with a philips screwdriver, just ahead of the arm rest.
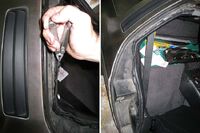
- Remove the cover for the upper seat belt bolt by pulling it off with your fingers. If it is too tight, you can simply pry it loose with a flathead screwdriver.
- Using a socket wrench with a 17mm socket, remove the upper seat belt bolt. This will also remove a washer and a a spacer, which allows the seat belt housing to rotate freely around the bolt. Be sure to keep track of how these go together so you can put them back in properly.
- Check for any other screws. Some cars may have a screw located near the top corner of the rear window.
- The trim panel should now be loose, but there are still two fir trees holding it to the body. They are in roughly the center of the panel, with one above and one below the hole that the seat belt bolt passes through. To detach them, simply pull the panel very firmly away from the body. You may also be able to pry them free with a long flathead screwdriver. While you need to be careful not to damage the panel, you will also need to pull quite hard to free it.

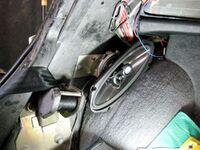
The newly installed 4"x10" Eclipse SE-8405 speaker.
Now that the trim panel is out of the way, you can replace the speaker.
- Using a flathead screwdriver, loosen the hose clamp on holding the speaker into place.
- Disconnect the two wires from the speaker. These are attached with spade-style connectors.
- Connect the wires to the new speaker.
- Mount the speaker, making sure it is aligned correctly, and tighten the hose clamp.
Reverse the instructions above to re-attach the trim panel. It can be difficult to get the fir trees back in, but you may be able to skip installing them and see if the panel will hold sufficiently by the seat belt bolt alone. You can glue the edge of the trim back in place with weather stripping adhesive or a similar glue, or you can simply press the weather stripping back over it if it seems that it will hold firmly enough.
Alternate Instructions[]
- Luke Sandel has rear speaker replacement instructions on his site, including pictures of the process. In his case, the edge of the weather stripping needed to be cut before it could be pried up with a putty knife, but the final cut is hidden by the weather stripping. He also removed the bracket along with the speaker, which may be necessary if the hose clamp screw is hidden under the speaker.
- WyldKard describes his experience using Luke's instructions above, including where he needed to make changes for his car.
- John Spangler has his own set of rear speaker replacement instructions on his site, along with numerous pictures. Running the length of his trim's edge were a number of clips, which both secured the trim and held the weather stripping in place. He also had to remove an extra screw on the top of the trim panel, at the top corner of the rear window.